Site Inventory and Mapping
The Chief Marketing Office has developed a Microsoft Excel template to complete an inventory of site pages and documents and a Microsoft Word template to generate a Visual Site Map of how the pages connect. Below are step-by-step editing instructions for each template.
Download the State of Vermont Site Inventory or Site Map Templates
Instructions to Edit the State of Vermont Site Inventory Template
Instructions to Edit the State of Vermont Visual Site Map Template
Download the State of Vermont Site Inventory and Site Mapping Templates
Please note the Site Inventory and Visual Site Map templates are located on the Chief Marketing Office SharePoint site and are only available to State of Vermont employees.
Site Inventory Template
This template includes two worksheets. One sheet to inventory the pages of a website and one sheet to inventory the documents.
Visual Site Map Template
This template includes a SmartArt template to generate a visual of how the pages of a site connect.

Instructions to Edit the State of Vermont Site Inventory Template
Step 1: Create a Template File in Excel
Step 2: Create a New Document in Excel
Step 3: Edit the Document Properties in Excel
Step 4: Edit Content on the Page Inventory Sheet
Step 5: Edit Content on the Document Inventory Sheet
Step 1: Create a Template File in Excel
The first step is to create an actual Excel template file on your computer. Saving the document as a 'true' Excel template will allow you to use the template again and again without the danger of overwriting it.
- Open
Open the template in your web browser.
- Editing
Select the 'Editing' menu in the upper right to expand the editing options.
- Open in Desktop App
Select the 'Open in Desktop App' option.
- Save As
Select the ‘File’ menu at the top of the screen and 'Save As'.
- File Type
Place your cursor in the 'File Type' field where Excel Workbook (*.xlsx) appears.
- Word Template
Select the 'Excel Template (*.xltx)' option in the list.
- Go To the Recommended Folder
Select the 'Go to recommended folder' link.
- Save
Select 'Save'.
- File
Select the 'File' menu at the top of the screen and 'Close'.
Create a Template
Explore the Microsoft Support section to learn how to create a template.
Step 2: Create a New Document in Excel
The next step is to create a new document based on your saved template. In this step, you will save the document with a file name that meets accessibility standards.
- New
Select the ‘File’ menu at the top of the screen and 'New'.
- Personal
Select the 'Personal' tab to see the template you previously saved.
- Template File
Select the template file. The actual name will vary depending on the version of the file.
- Save As
Select the ‘File’ menu at the top of the screen and 'Save As'.
- Enter the File Name Here
Place your cursor in the 'Enter the file name here' field.
- Navigate
Navigate to where you wish to save the file.
- Enter File Name Here
Type your file name in the 'Enter file name here' box.
- Don't include 'final' or 'draft' as part of your document name.
- Use lowercase letters with dashes (for example, document-accessibility-checklist.docx).
- Do not use underscores, spaces, special characters, or version dates (unless it’s in the title).
- Save
Select 'Save'.
Create a Document
Watch a video from the Microsoft Support section to learn how to create a new workbook in Excel.
Create Accessible File Names
Watch a video from the Microsoft Support section to learn how to create accessible file names.
Step 3: Edit the Document Properties in Excel
In step three, you will edit the document metaproperties (Title, Tags, Comments, Author, etc.). Start by adding a title and updating the author.
The title is different from the file name. This is an opportunity to be more descriptive without the file naming convention elements like dashes, dates, versions, etc. It also improves the overall searchability and accessibility of the document properties.
The author is listed as the individual who developed the template by default. It is essential to update the author to you and/or your team's other member(s). This detail is helpful if a reader needs to connect with the author.
- Info
Select the ‘File’ menu at the top of the screen and 'Info'.
- Show All Properties
Select 'Show All Properties' at the bottom on the right.
- Title
On the right, there is an option for a 'Title'. Place your cursor anywhere in the text 'Add a title' and enter your document title.
- Don’t include 'final' or 'draft' in the title.
- A best practice is to use the title supplied on your document's first page.
- Author
Update the document author.
- Remove Person
Right-click on the current author and select 'Remove Person'.
- Add an Author
Select the 'Add an author' field.
- Address
Select the 'Address' book button.
- Search
Place your cursor in the 'Search' field.
- Last Name of the Author
Type the last name of the author and press 'Enter'.
- Select
Select the correct author from the search results.
- To
Select 'To'.
- Ok
Select 'Ok'.
- Back Arrow
Select the back arrow at the top of the screen to return to the template.
- Save
Select 'Save'.
View or Change the Properties for an Office File
Visit the Microsoft Support section to learn how to view or change the properties of an Office file.
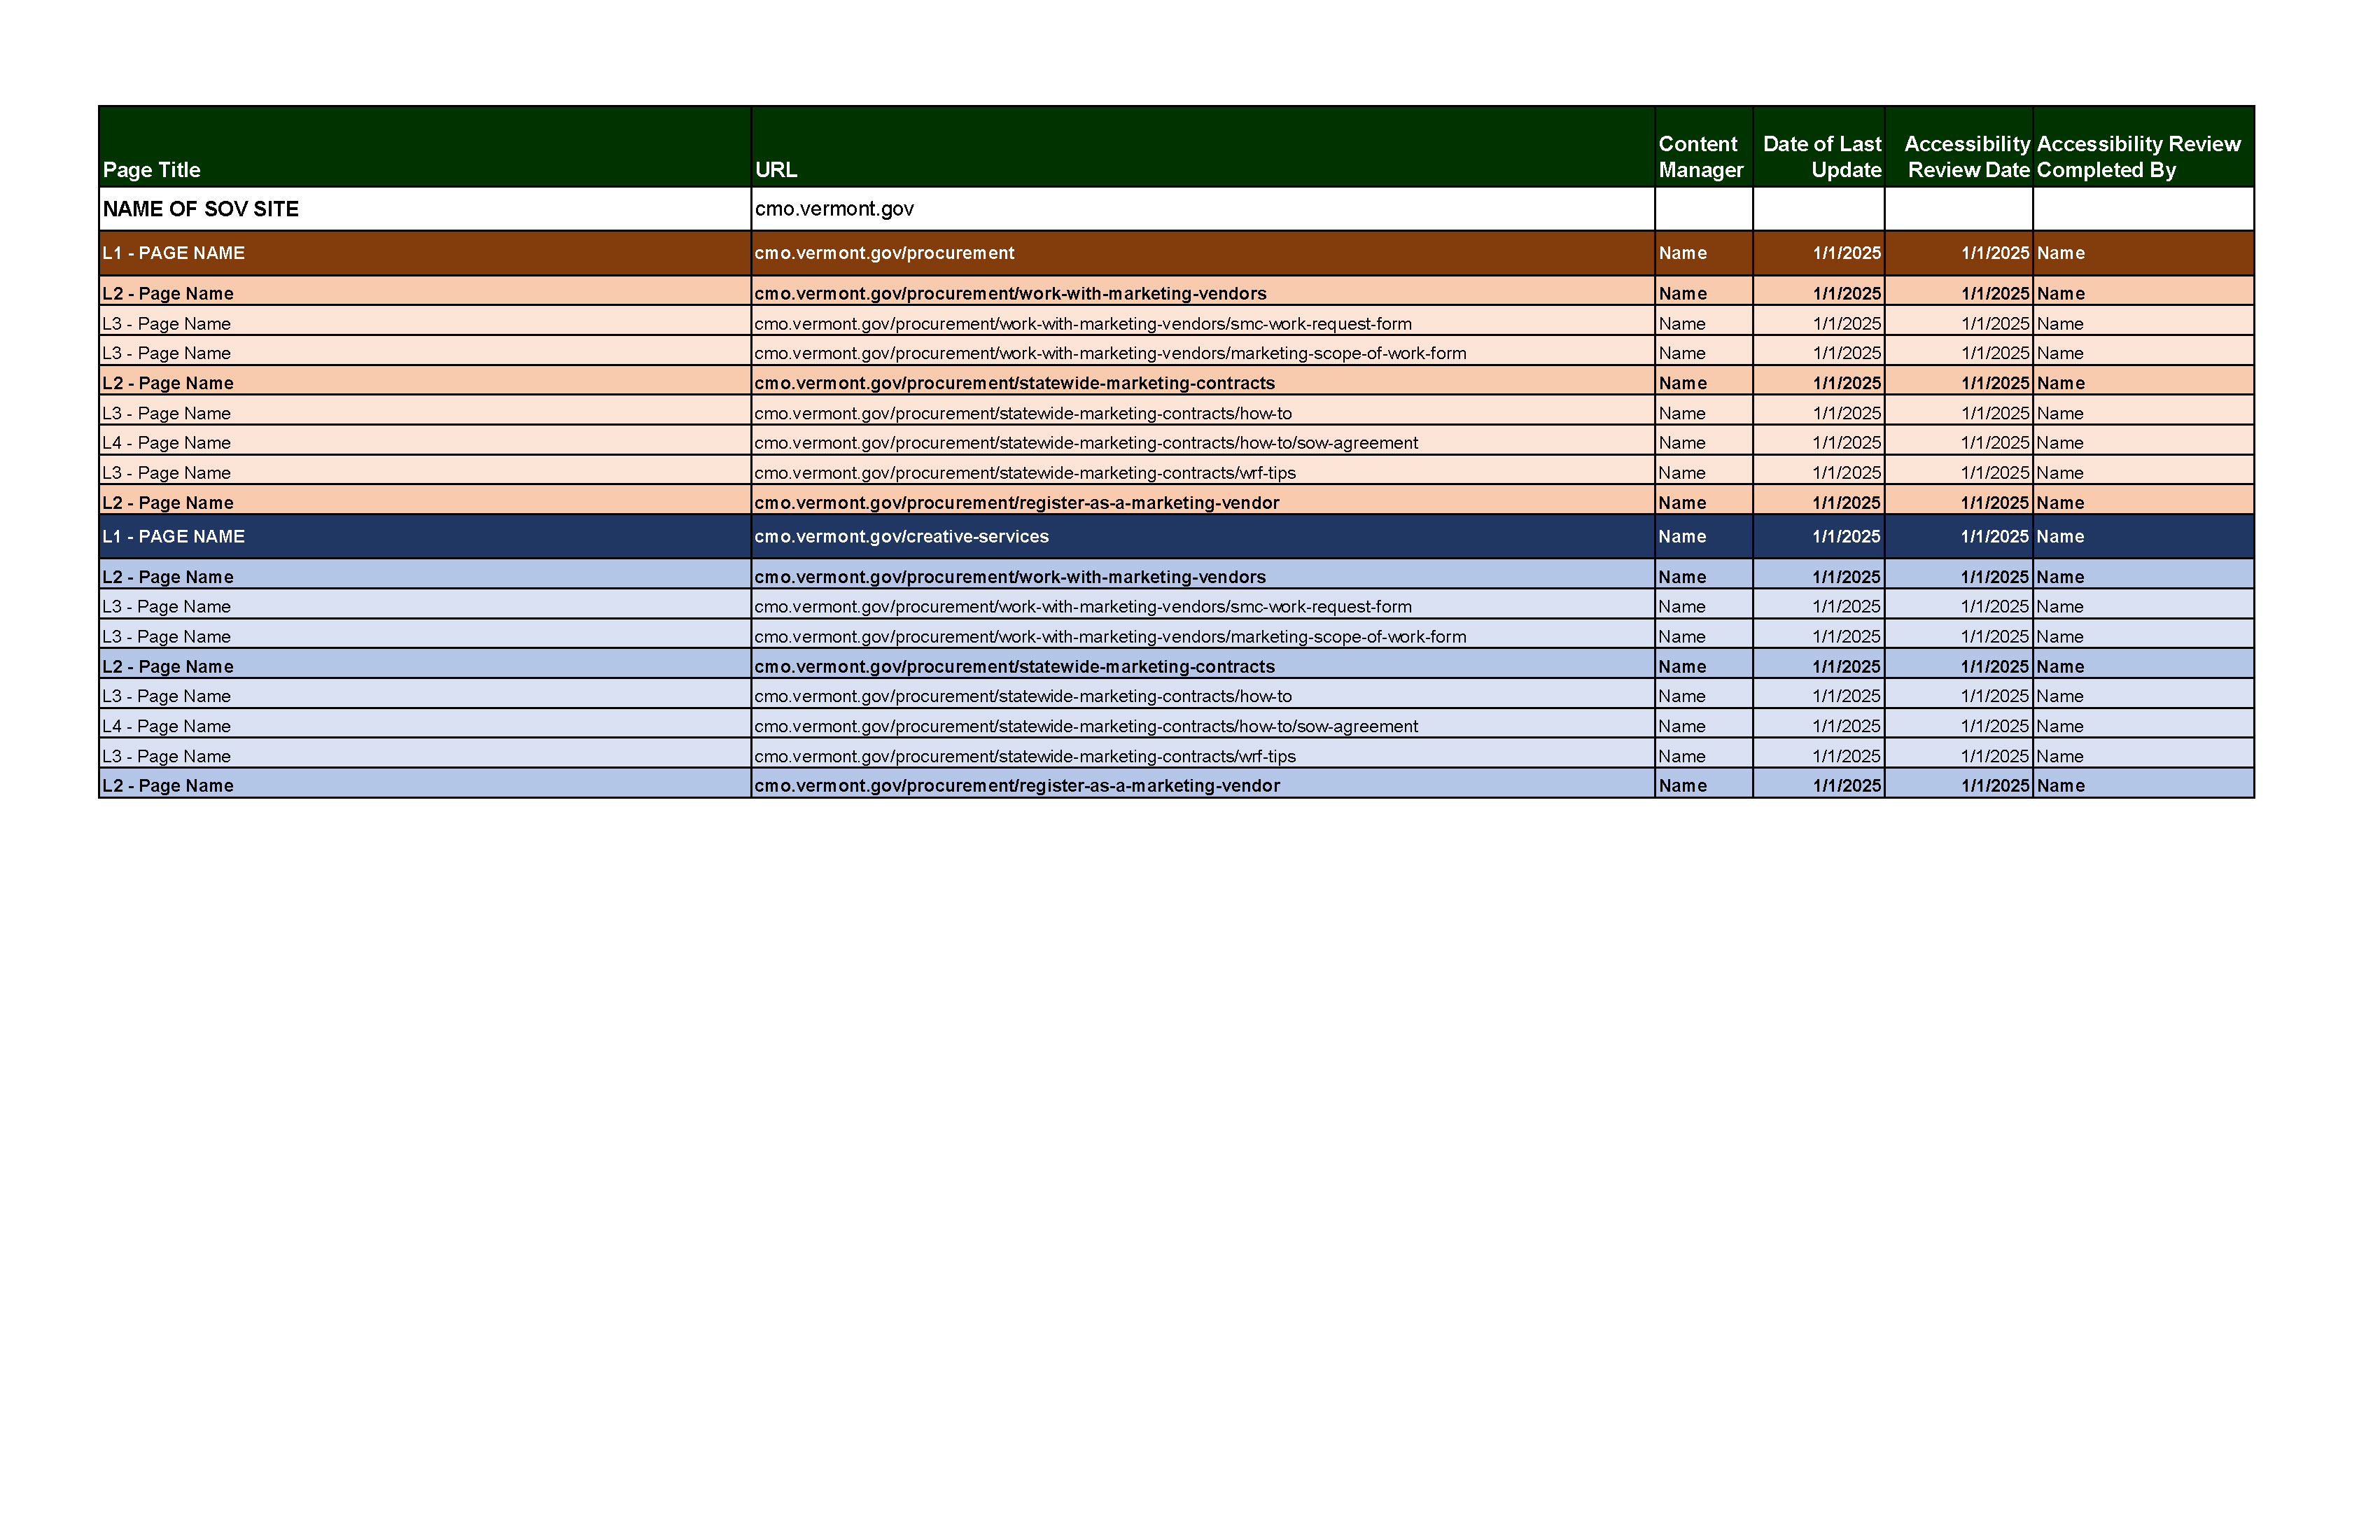
Step 4: Edit Content on the Page Inventory Sheet
On the 'Page Inventory' sheet, there are boilerplate entries for the most common page levels of a website: L1, L2, L3, and L4. For each page, you will track the URL, page type/goal, content manager, date of last update, accessibility review date, who the accessibility review was completed by, if the page has gone through a plain language review, who the plain language review was completed by, and relevant notes. Entities are welcome to customize the columns and data that they track for each of their webpages. To generate the SOV Visual Site Map in the next step, you will need the format and settings for column 1. ‘Page Title’ should remain as is.
When entering the Page Title, it is important to always leave the level details. For example, the entry for a level one page should always read ‘L1 – Page Title’ rather than just ‘Page Title’. This detail helps users understand the hierarchy of the site pages and how they relate to one another and will be needed to generate the SOV Visual Site Map in the next step.
Step 5: Edit Content on the Document Inventory Sheet
On the 'Document Inventory' sheet, there is an example entry, followed by boilerplate entries. For each document, you will track the URL, content manager, date of last update, accessibility review date, who the accessibility review was completed by, if the page has gone through a plain language review, who the plain language review was completed by, and relevant notes. Entities are welcome to customize the columns and data that they track for each of their site documents.
Instructions to Edit the State of Vermont Visual Site Map Template
The Visual Site Map includes a SmartArt template to generate a visual of how the pages of a site connect. It is important to note that the SmartArt feature in Word is not inherently accessible. If you choose to create a PDF of the Visual Site Map, you will need to Run the Acrobat Accessibility Checker to make the PDF accessible.
Step 1: Create a Template File in Word
Step 2: Create a New Document in Word
Step 3: Edit the Document Properties in Word
Step 4: Open the Styles Panel in Word
Step 6: Run the Accessibility Checker in Word
Step 7: Remove Comments in Word
Step 9: Run the Acrobat Accessibility Checker
Step 1: Create a Template File in Word
The first step is to create an actual Word template file on your computer. Saving the document as a 'true' Word template will allow you to use the template again and again without the danger of overwriting it.
- Open
Open the template in your web browser.
- Editing
Select the 'Editing' menu in the upper right to expand the editing options.
- Open in Desktop App
Select the 'Open in Desktop App' option.
- Save As
Select the ‘File’ menu at the top of the screen and 'Save As'.
- File Type
Place your cursor in the 'File Type' field where Word Document (*.docx) appears.
- Word Template
Select the 'Word Template (*.docx)' option in the list.
- Go To the Recommended Folder
Select the 'Go to recommended folder' link.
- Save
Select 'Save'.
- File
Select the 'File' menu at the top of the screen and 'Close'.
Create a Template
Explore the Microsoft Support section to learn how to create a template.
Step 2: Create a New Document in Word
The next step is to create a new document based on your saved template. In this step, you will save the document with a file name that meets accessibility standards.
- New
Select the ‘File’ menu at the top of the screen and 'New'.
- Personal
Select the 'Personal' tab to see the template you previously saved.
- Template File
Select the template file. The actual name will vary depending on the version of the file.
- Save As
Select the ‘File’ menu at the top of the screen and 'Save As'.
- Enter the File Name Here
Place your cursor in the 'Enter the file name here' field.
- Navigate
Navigate to where you wish to save the file.
- Enter File Name Here
Type your file name in the 'Enter file name here' box.
- Don't include 'final' or 'draft' as part of your document name.
- Use lowercase letters with dashes (for example, document-accessibility-checklist.docx).
- Do not use underscores, spaces, special characters, or version dates (unless it’s in the title).
- Save
Select 'Save'.
Create a Document
Watch a video from the Microsoft Support section to learn how to create a document in Word.
Create Accessible File Names
Watch a video from the Microsoft Support section to learn how to create accessible file names.
Step 3: Edit the Document Properties in Word
In step three, you will edit the document metaproperties (Title, Tags, Comments, Author, etc.). Start by adding a title and updating the author. Once updated, the document metaproperties will be transferred to the PDF document properties.
The title is different from the file name. This is an opportunity to be more descriptive without the file naming convention elements like dashes, dates, versions, etc. It also improves the overall searchability and accessibility of the document properties.
The author is listed as the individual who developed the template by default. It is essential to update the author to you and/or your team's other member(s). This detail is helpful if a reader needs to connect with the author.
- Info
Select the ‘File’ menu at the top of the screen and 'Info'.
- Show All Properties
Select 'Show All Properties' at the bottom on the right.
- Title
On the right, there is an option for a 'Title'. Place your cursor anywhere in the text 'Add a title' and enter your document title.
- Don’t include 'final' or 'draft' in the title.
- A best practice is to use the title supplied on your document's first page.
- Author
Update the document author.
- Remove Person
Right-click on the current author and select 'Remove Person'.
- Add an Author
Select the 'Add an author' field.
- Address
Select the 'Address' book button.
- Search
Place your cursor in the 'Search' field.
- Last Name of the Author
Type the last name of the author and press 'Enter'.
- Select
Select the correct author from the search results.
- To
Select 'To'.
- Ok
Select 'Ok'.
- Back Arrow
Select the back arrow at the top of the screen to return to the template.
- Save
Select 'Save'.
View or Change the Properties for an Office File
Visit the Microsoft Support section to learn how to view or change the properties of an Office file.
Step 4: Open the Styles Panel in Word
The template includes preset styles that are accessible. Each content type within the template begins with details in parentheses. This detail designates the paragraph style for that content type and if any character styles are applied.
Use headings to organize your content, and use lists whenever possible – bulleted or numbered. Using the headings in the correct order organizes your content for people who might be using assistive technology such as screen readers. Screen readers can navigate a document by paragraph style. Designating headings within sections sequentially will create a hierarchy. This hierarchy helps users receive content in the correct order. Never skip heading levels.
Sample Heading Nest
Heading 1
Normal Text Large: Lorem ipsum dolor sit amet, consectetur adipiscing elit. Maecenas tempus aliquam accumsan. Duis tincidunt turpis quam, in commodo sem malesuada.
Heading 2
Normal Text: Lorem ipsum dolor sit amet, consectetur adipiscing elit. Maecenas tempus aliquam accumsan. Duis tincidunt turpis quam, in commodo sem malesuada.
Heading 3
Normal Text: Lorem ipsum dolor sit amet, consectetur adipiscing elit. Maecenas tempus aliquam accumsan. Duis tincidunt turpis quam, in commodo sem malesuada.
- Home
Navigate to the 'Home' menu at the top of the screen.
- Styles Dialog Launcher
Select the 'Styles Dialog Launcher' button (down arrow) in the lower right-hand corner of the ‘Styles’ section of the ribbon.
- Styles Panel
This opens the 'Styles' panel.
Helpful Tip
In the 'Styles' panel, paragraph and character styles are distinguished by ‘a’ or ‘¶a’. The ‘a’ are character styles, and ‘¶a’ are paragraph styles.
Improve Accessibility with Heading Styles
Watch a video from the Microsoft Support section to learn about improving accessibility with heading styles.
Step 5: Edit Site Map Content
Before you begin to add content to the template, select the ‘Home’ menu at the top of the screen and 'Show / Hide ¶'. This will display hidden characters.
The template includes basic content types. Each element has been assigned paragraph and/or character styles, which help improve document accessibility. Each content element begins with the specified style(s) in parenthesis. By example:
(Heading 1, Bold Character Style) [SOV Entity Name] Visual Site Map
When you complete your document, you will want to remove the specified style(s) within the parenthesis, but during the draft process, these are helpful reminders if styles need to be re-applied. To add content to the template, you can type directly into the template or copy and paste content.
- Select Content
In the Heading 1 line of text, select the '[SOV Entity Name]' text.
- Update Content
Enter the name of your State entity.
- Select Content
In the Heading 1 line of text, select the '(Heading 1, Bold Character Style)' text.
- Backspace
Press backspace to remove the styles information.
- Select Content
Select the 'SmartArt' that was inserted on the page. Helpful Tip: Make sure you select the outermost object. The individual elements should not appear to be selected.
- Site Inventory Excel File
Go to the 'Excel Site Inventory' that you created for your site.
- Select Content
Select all of the page names. Helpful Tip: This is only the first column of the sheet, minus the ‘Page’ heading and 'Name of SOV Site'.
- Copy
Copy the selected rows of the page names.
- Site Map Word Document
Go back to your Site Map Word document.
- SmartArt Design Tab
With the SmartArt still selected, open the 'SmartArt Design' tab at the top of the screen.
- Text Pane
Select the 'Text Pane' option to ensure the 'Type your text here' box is open.
- Enlarge Type Your Text Box Here Window
Drag the corner of the 'Type your text here' box to make it larger.
- Place Your Cursor
Place your cursor on the first bulleted item in the 'Type your text here' box.
- Enter URL
Enter the URL of your SOV site in the first bulleted item.
- Enter
Press 'Enter' to move your cursor to the second line.
- Paste
Paste the content that you copied from your 'Excel Site Inventory'.
- Select
Select all the items below your SOV site name.
- Demote
Select the 'Demote' option at the top of the screen.
- Select
In the 'Type your text here' box, select all the items between the 'L1' headers.
- Demote
Select the 'Demote' option at the top of the screen.
- Select
In the 'Type your text here' box, select all the items between each 'L2' header.
- Demote
Select the 'Demote' option.
- Repeat
Repeat as necessary for items between the 'L3' and 'L4' headers. This will establish a bulleted list nest/hierarchy for all the page levels of your site.
Optional Design Preferences
- Select Content
Select the 'SmartArt' that was inserted on the page. Helpful Tip: Make sure you select the outermost object. The individual elements should not appear to be selected.
- Home Tab
Go to the 'Home' tab on the top of the screen.
- Font Settings
Update the 'Font' settings to 'Arial' and '10pt'.
- Format Tab
Go to the 'Format' tab on the top of the screen.
- Height and Width
Use the 'Height' and 'Width' settings to adjust the size of the various boxes to ensure text does not overlap the edges. Helpful Tip: Try to achieve as much consistency as possible for the boxes within any heading level. For example, all heading level 1 boxes may be .5” height and 2” width.
WebAIM Contrast Checker
Visit WebAIM to check color combinations with the Contrast Checker.
ContrastChecker.com
Visit ContrastChecker.com to check color combinations.
Add Alternative Text
Visit the Microsoft Support section to learn to add alternative text to a shape, picture, chart, SmartArt graphic, or other object.
Write Alt Text and Image Descriptions for the Visually Impaired
Visit the Perkins School for the Blind to learn how to write alt text and image descriptions for the visually impaired.
Write Effective Alt Text
Visit the Microsoft Support section to learn everything you need to know to write effective alt text.
Improve Accessibility with Alt Text
Review a video from the Microsoft Support section to learn how to improve accessibility with alt text.
Insert Footnotes and Endnotes
Review a video from the Microsoft Support section to learn how to insert footnotes and endnotes.
Step 6: Run the Accessibility Checker in Word
Run the Word Accessibility Checker to make sure your document is accessible. The checker provides errors and warnings when content formatting is not considered accessible. Additionally, the Accessibility Checker provides direction or tips on fixing errors and warnings. This can be done after the document is drafted, but keeping it running as you work is more helpful so you can correct issues as you add content.
- Review
Open the 'Review' menu at the top of the screen.
- Check Accessibility
Select 'Check Accessibility' to open the 'Accessibility' panel.
- Review the Accessibility Panel
Review the 'Accessibility' panel for any 'Errors' or 'Warnings'.
- Correct Errors and Warnings
Correct each of the 'Errors' and 'Warnings'.
Check the Accessibility of your Document
Review a video from the Microsoft Support section to check the accessibility of your document.
Improve Accessibility with the Accessibility Checker
Visit the Microsoft Support section to learn how to improve accessibility with the Accessibility Checker.
Step 7: Remove Comments in Word
The template contains comments that have helpful reminders and tips when adding your content. Before creating a PDF of the Word document, the comments need to be removed so they do not save as part of the PDF file.
- Review
Open the 'Review' menu at the top of the screen.
- Show Comments
On the 'Show Comments' button, select the down arrow and select 'List' to open the 'Comments' panel.
- Review Comments
Review each comment to make sure there are no remaining items to address.
- Comment Options
At the top of each comment is a series of three dots.
- Delete Thread
Select the three dots and 'Delete Thread' to remove each comment.
Step 8: Save as a PDF in Word
Before creating a PDF of the Word document, make sure the following steps have been completed:
- Remove all comments.
- Remove all Paragraph Styles provided in parentheses throughout the template.
- Run the Accessibility Checker one final time and correct all errors and warnings.
- Run a final spell check.
- Acrobat
If you have Adobe Acrobat Pro DC, open the 'Acrobat' tab at the top of the screen and select 'Create PDF'.
- File
If you have Adobe Reader, open the 'File' menu at the top of the screen and select 'Save as Adobe PDF'.
- Navigate to File Folder
Navigate to the location where you would like to save your PDF.
- Save
Select 'Save'.
Helpful Tip
Do not create a PDF by selecting 'Print' and changing your 'Printer' to 'Adobe PDF'. Do not create a PDF by selecting 'Save As' and changing your file type/extension to 'PDF'.
Save or Convert to PDF or XPS in Office Desktop Apps
Visit the Microsoft Support section to learn how to save or convert to PDF in Office desktop apps.
Create Accessible PDFs
Visit the Microsoft Support section to learn how to create accessible PDFs.
Step 9: Run the Acrobat Accessibility Checker
Once the Word document has been saved as a PDF, the new file must be opened in Adobe Acrobat Pro. The Accessibility Checker must be completed to find accessibility issues within the PDF file. Even though the Accessibility Checker was run in the Word file, elements often need to be corrected on the PDF version. Frequently, some of the Acrobat Accessibility Check warnings confirm the document properties and formatting completed in the steps above. It is essential to see this as an opportunity to double-check that content meets accessibility guidelines.
- Open
Open your PDF.
- Menu
Open the 'Menu' at the top of the screen and select 'Document properties'.
- Add Metadata
Add metadata (Title, Author, Subject, Keywords) on the 'Description' tab. The Document Properties that were added in Step 3 above should be provided. This step assures that all the metadata details are as intended.
- Ok
Scroll down to the bottom of the window and select 'Ok'.
- Prepare for Accessibility
Select the 'All tools' menu, 'Prepare for accessibility', and 'Check for accessibility'.
- Accessibility Checker Options
On the 'Accessibility Checker Options' window, select 'Select All' to ensure all options are checked.
- Start Checking
Select 'Start Checking'.
- Accessibility Checker
A new 'Accessibility Checker' panel opens with details of any accessibility issues within your PDF file.
- Correct Accessibility Issues
Correct each of the accessibility issues that have been flagged.
Create and Verify PDF Accessibility (Acrobat Pro)
Visit Adobe to learn how to create and verify PDF accessibility in Acrobat Pro.